At the base of the test automation pyramid is unit testing. Unit testing should be the foundation of a solid test automation strategy and as such represents the largest part of the pyramid. (…) Automated user interface testing is placed at the top of the test automation pyramid because we want to do as little of it as possible. (…) Testing through the user interface like this is expensive and should be minimized. Although there are many test cases that need to be invoked, not all need to be run through the user interface. And this is where the service layer of the test automation pyramid comes in. - Mike Cohn https://www.mountaingoatsoftware.com/blog/the-forgotten-layer-of-the-test-automation-pyramid
Depending on your personal style (look at this post by Martin Fowler for more details around different flavours of unit testing) and probably also the task at hand, you will either be starting with a unit test or acceptance/functional test. The rest of this post will show you how to set up each kind of test and give you a brief description of what we mean by saying unit, integration and functional test. I will also describe our gulp setup.
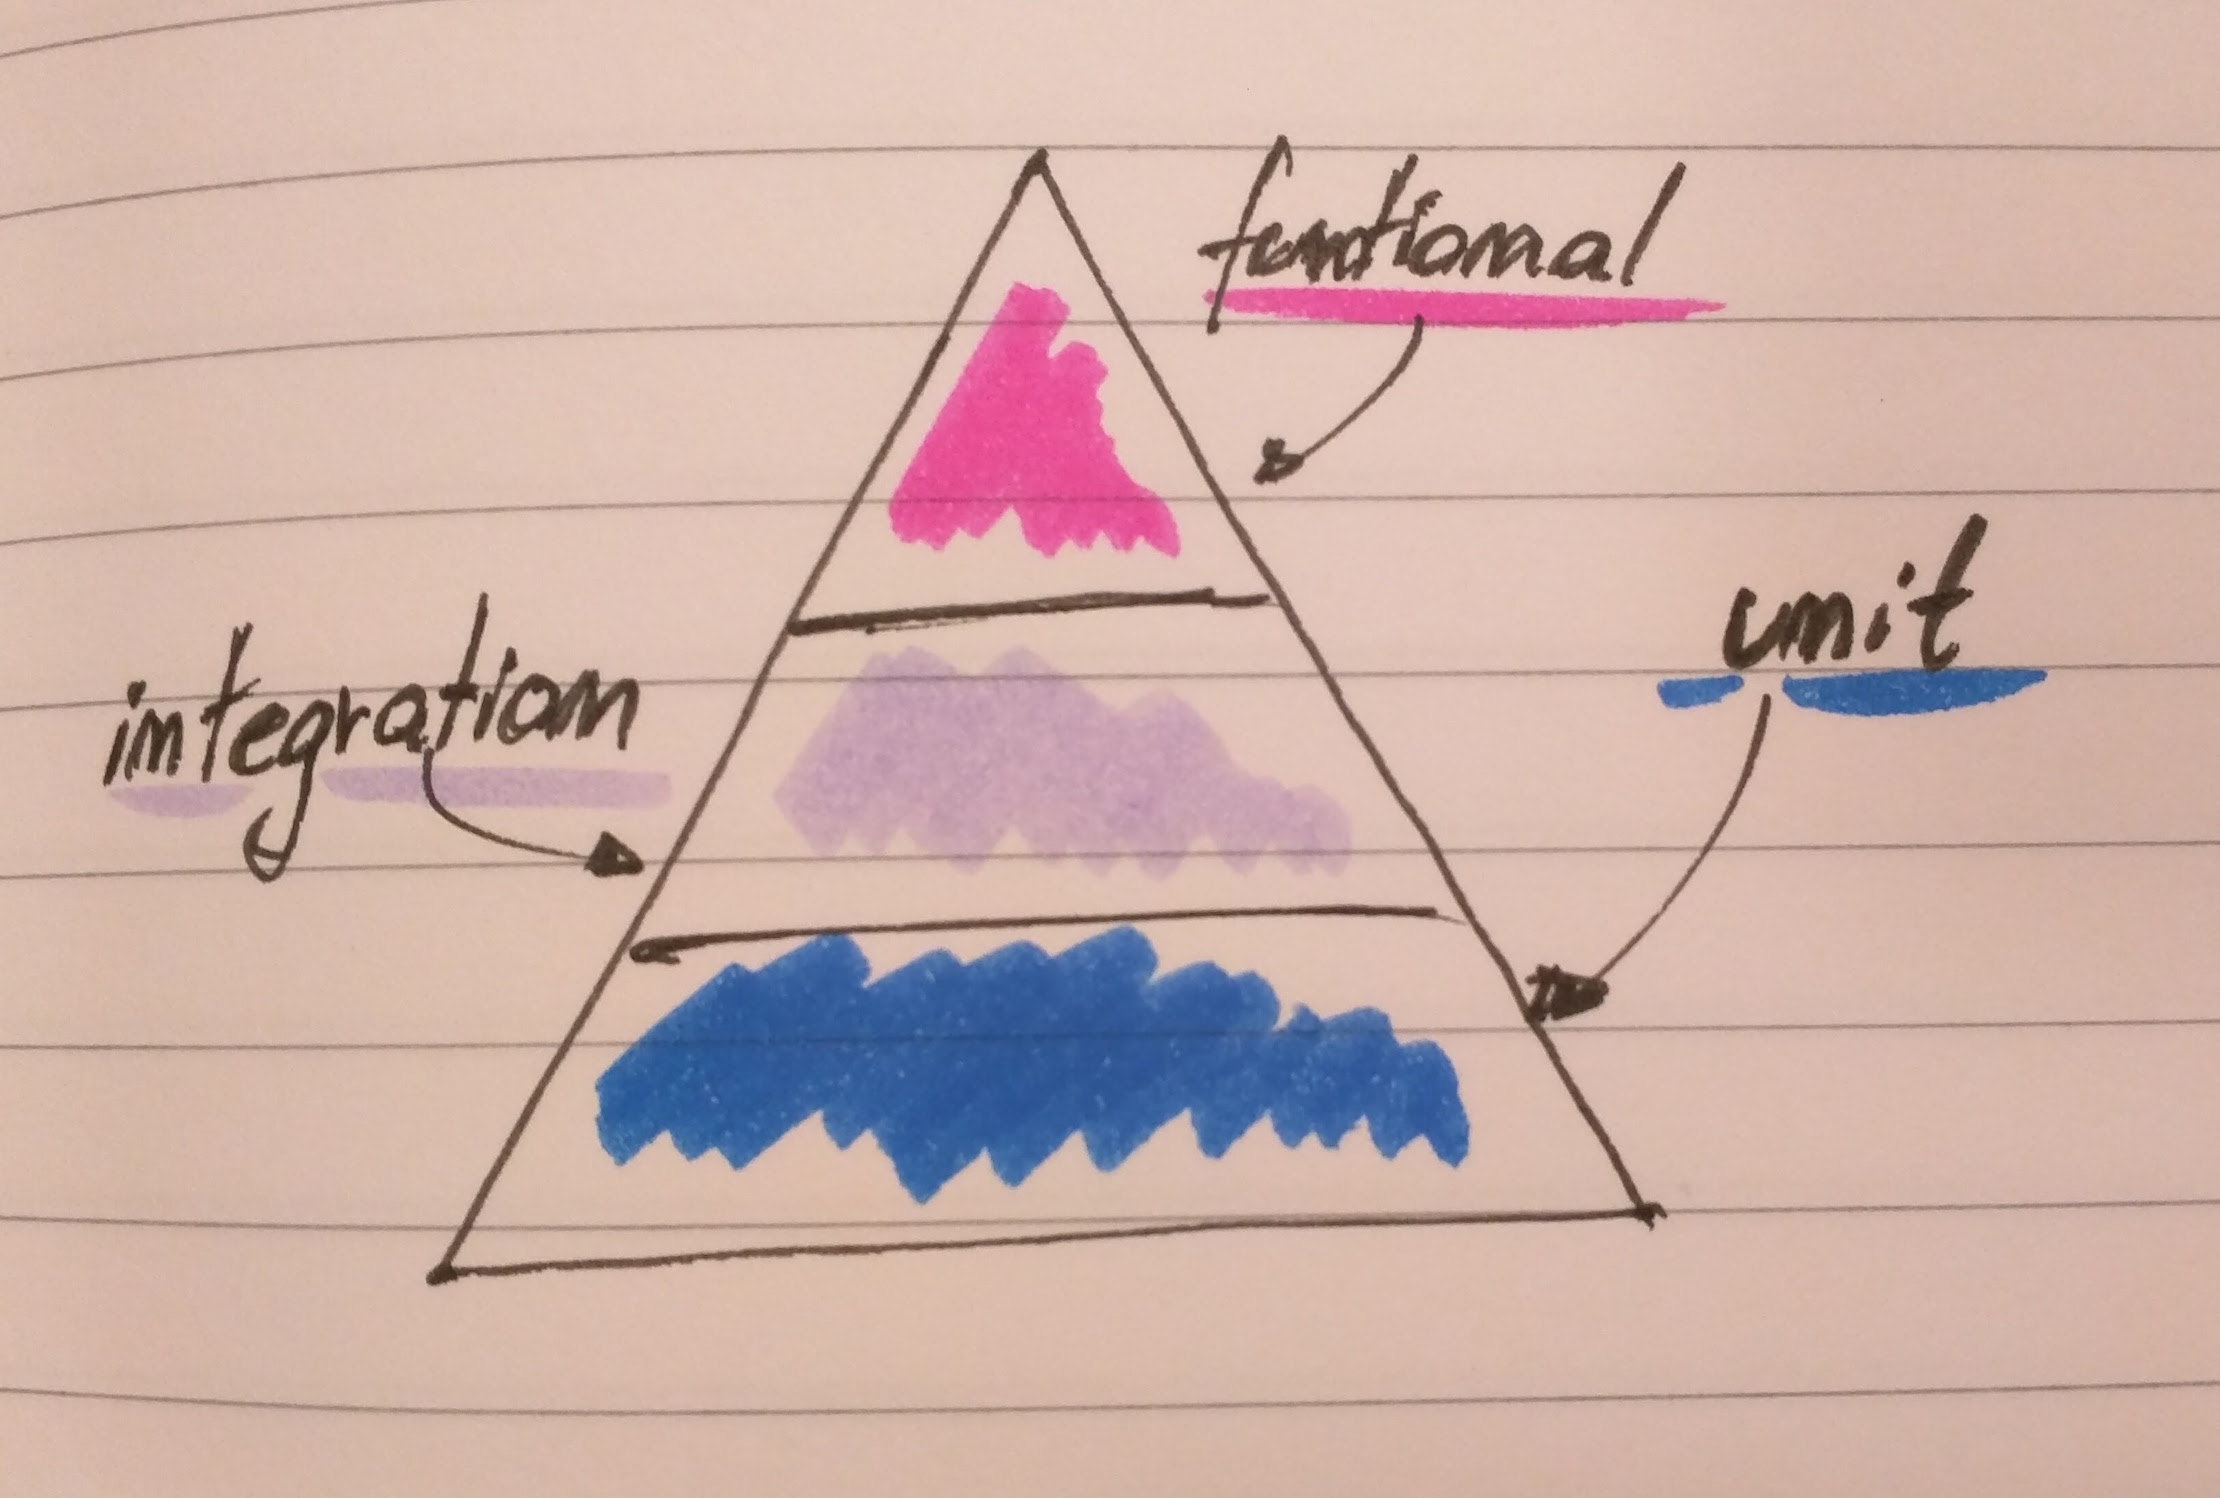
Unit test
In JavaScript and node.js world your are spoiled for choices in regards to your unit tests libraries and runners: Jasmine, Mocha and friends, just pick one. We decided to go with Jasmine, in which a test looks like this:
/* jshint node: true */
/* global describe, beforeEach, afterEach, it, jasmine, expect */
'use strict';
describe('exractParticipant', function () {
  var extractParticipant;
  var validRequestData = {
    body: {
      firstname: 'Mark',
      lastname: 'Mueller',
      email: 'm.mueller@example.com'
    }
  };

  beforeEach(function () {
    extractParticipant= require('../routes/registration.js').extractParticipant
  });

  it('should read firstname from the request body', function() {
    expect(extractParticipant(validRequestData).firstname).toBe('Mark');
  });

  it('should throw an error if no firstname can be found', function () {
    function callWithNoFirstname() {
      extractParticipant({body: {}});
    }

    expect(callWithNoFirstname).toThrow();
  });
}
Here we are verifying the behavior of the extractParticipant() function which given a request body returns a specific JS object. We can use multiple describe calls, or even nested describe calls to cluster the tested functionality. Each it call corresponds with a specific behaviour we want to verify. Jasmine provides matchers and spies to simplify our testing: Just look at the reference to see what’s possible. Generally it’s a good practice to verify one specific aspect per test. Any other recommendations, you ask {%gemoji sunglasses%} A good unit test is:
- fast: All the unit tests will be executed very often, therefore it’s necessarry that their execution happens in ms
- atomic: The unit tests should be independant from one-another, so that you can run them parallel. This means that they should not relay on any side effects (data modifications done by other tests etc.). It’s also way easier to reason why a certain test is red, if all you need to care about is only the scope of that particular test.
As usual Martin Fowler wrote a nice bliki about unit tests.
Integration test
As the name already states, an integration test verifies the behaviour of a group of components of our software acting together. Look at the following test, which checks the intgeration between a service and the database:
'use strict';
/* jshint node: true */
/* jshint esnext: true */
/* global describe, beforeEach, afterAll, it, jasmine, expect */

describe('participants service', function () {

    const participants = require('../../service/participants');
    var pg = require('pg');

    beforeEach(function (done) {
        var connectionString = process.env.SNAP_DB_PG_URL || "tcp://vagrant@localhost/pace";
        var jasmineDone = done;

        pg.connect(connectionString, function (err, client, done) {
                client.query('delete from participants', function () {
                    done();
                    jasmineDone();
                });
            }
        );

    });

    afterAll(function(done) {
        pg.end();
        done();
    });


    it('should store and read participants', function (done) {
        var aParticipant = {
            firstname: 'Hertha',
            lastname: 'Mustermann',
            email: 'h.mustermann@example.com'
        };

        participants.save(aParticipant)
            .then(participants.getAll)
            .then(function (data) {
                expect(data.length).toBe(1);
                expect(data[0].firstname).toBe(aParticipant.firstname);
                expect(data[0].lastname).toBe(aParticipant.lastname);
                expect(data[0].email).toBe(aParticipant.email);
                done();
            });
    });
});
The integration test is similiar to the unit one (it’s also based on jasmine), but instead of mocking our dependencies we use the real implementation (here the pg PostgreSQL client) and verify the integration of both components. In this particular example, we store a participant and expect that if we call the getAll function, it will be returned in the correct form. As the test will actually store objects in the dabase, we need to assure that before we execute the test, the database is cleared. This is done in the beforeEach method. You may ask ‘why before the test and not afterwards’: In case of an error, we will still have the possibility to check the state of the database.
As we need to connect to the database and assure a particular state before each test run, those tests will always be slower than the unit ones. Therefore we should try to test only the integrational aspects in them and everything else on the unit level. In the end we are not interested in a test suite for a 3rd party component, but only a verification of the fact that our usage of it is correct.
Functional test
Whenever we test the system as a whole, we talk about functional tests. Typically those tests go against an outer-most interface of our app, often the UI. In our case we will interact with pace via its web page. To do that, we use WebDriverIO on top of selenium and a headless browser called phantomjs. This combination offers an easy to use API for browser-interaction.
/* jshint node: true */
/* global describe, beforeEach, afterEach, it, jasmine, expect */
'use strict';
describe('regisitration journey', function () {
    var client;
    var paceUrl = process.env.PACE_URL || 'http://localhost:3000/';
    var originalTimeout;

    beforeEach(function () {
        var webdriverio = require('webdriverio');
        var options = {
            desiredCapabilities: {
                browserName: 'phantomjs'
            }
        };

        client = webdriverio.remote(options);
        originalTimeout = jasmine.DEFAULT_TIMEOUT_INTERVAL;
        jasmine.DEFAULT_TIMEOUT_INTERVAL = 10000;
    });

    afterEach(function () {
        jasmine.DEFAULT_TIMEOUT_INTERVAL = originalTimeout;
    });

    it('allows to register via the registration page', function (done) {

        client.init()
            .url(paceUrl)
            .click('a#registration')
            .setValue('input#firstname', 'Max')
            .setValue('input#lastname', 'Mustermann')
            .setValue('input#email', 'max@example.com')
            .setValue('input#gender', 'Unicorn')
            .click('button#submit')
            .isVisible('div.thanks')
            .then(function (isVisible) {
                expect(isVisible).toBe(true);
                done();
            })
            .end();
    });

});
First we need to setup the webdriver client to use the proper pace base url and browser. We also change the default jasmine timeout for async tests, as in general the browser based interactions tend to take more time. After that it is pretty straightforward: We click on a link, type into input fields, submit the form and verify that we land on the success page (look at webdriverio API for all the different interactions one can trigger). This is the happy path of our registration journey and as the functional test are the most expensive ones (in regards to the execution time), we will try to stick only to happy-path testing on this level.
Test execution
Ok, so how can you run all the tests in a convenient way? Pace uses gulp to build and automate a lot of stuff. Here are the important commands and convention:
- All tests (specs) should be places in the /spec directory
- All integration tests must have ‘IT’ in their filename
- All functional tests must have ‘Journey’ in their filename
- gulp test - runs all the unit tests
- gulp test-integration - runs all the integration tests, depends on existing database
- gulp test-functional - runs all functional tests, depends on installed selenium-server and drivers
To simplify the setup of a dev box, pace offers one simple command:
- gulp dev-setup - prepares the vagrant box with the databse, installs all dependencies for selenium and executes the database migrations